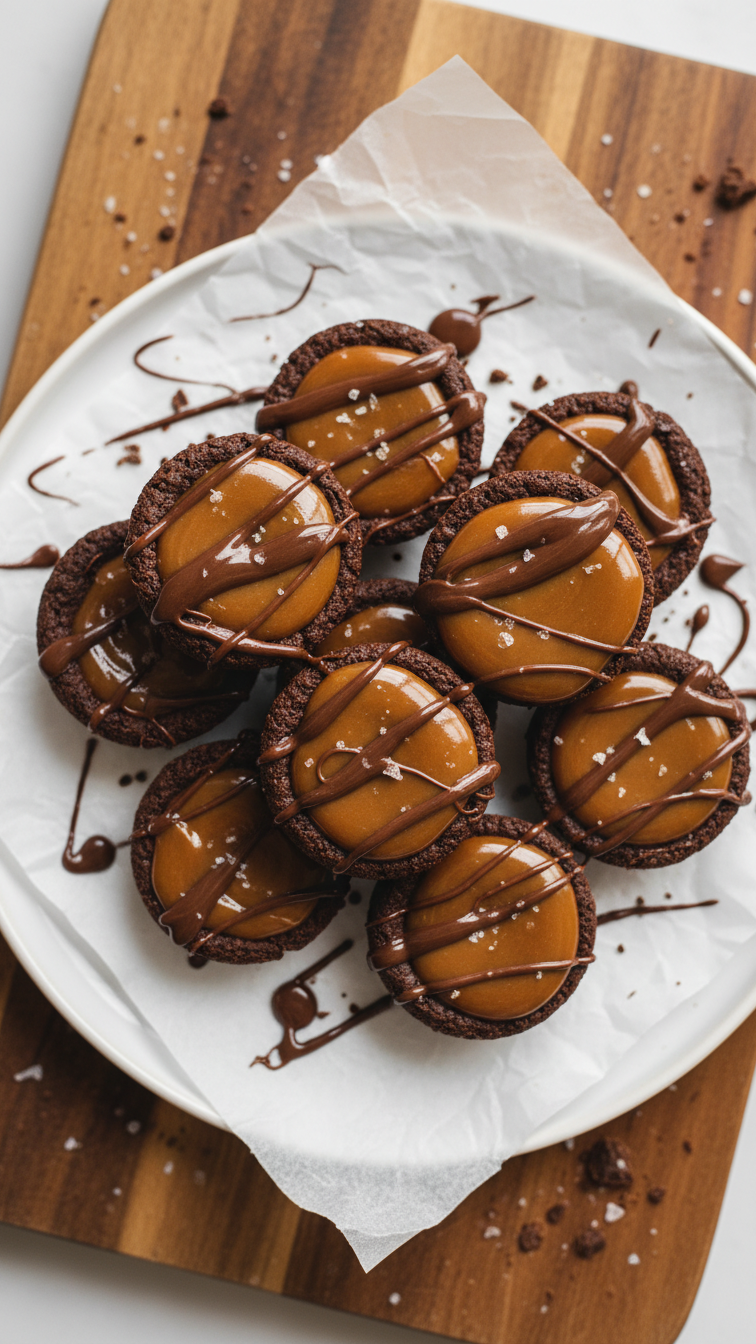
Homemade Chocolate Caramel Cups
Highlighted under: Baking & Desserts
I love making these Homemade Chocolate Caramel Cups when I want a delightful treat that's both rich and satisfying. The combination of smooth chocolate and gooey caramel never fails to impress my friends and family. What I enjoy most about this recipe is that it’s surprisingly simple to prepare at home, giving you a gourmet experience without any of the fuss. Plus, customizing the filling with nuts or sea salt allows me to add a personal touch for special occasions or just a cozy night in.
Creating these Homemade Chocolate Caramel Cups was a delightful experience that brought out my inner chocolatier. I experimented with different types of chocolate and found that a mix of dark and milk chocolate gave an incredible depth of flavor. I remember the first moment I bit into one; the contrast of textures as the chocolate shell cracked open to reveal the warm caramel inside was heavenly.
During my preparations, I discovered that allowing the caramel to cool slightly before pouring it into the chocolate cups made for a smoother finish. This small tip made a significant difference, ensuring that each cup was perfectly filled without overflowing. I encourage you to try using flavored salts or nut toppings to elevate these treats further!
Why You'll Love This Recipe
- Rich chocolate flavor paired with fresh caramel
- Gooey texture that melts in your mouth
- Perfect for celebrations or as a sweet indulgence
Mastering the Chocolate Shell
Creating the perfect chocolate shell is all about controlling the temperature while melting the chocolate. Use a double boiler to ensure even heating and prevent burning. Make sure the water is barely simmering; if it boils too vigorously, the steam can introduce moisture into the chocolate, which may cause it to seize. Stir the chocolate frequently until it’s completely smooth and glossy.
When coating the muffin tray or liners, aim for an even layer around 1/8 inch thick. Too thin, and the cups may break easily; too thick, and they’ll be overly rigid. I recommend doing two layers for a sturdier shell: after the first layer sets in the freezer, reheat the chocolate and coat again. This will give you beautifully robust cups that hold up well against the gooey caramel filling.
Perfecting the Caramel Filling
Making caramel can be intimidating, but it is crucial to watch the color closely as it cooks. The key to achieving that perfect deep amber hue is patience; avoid stirring until it reaches the right color to prevent crystallization. If the sugar begins to burn, you'll taste bitterness, so keep an eye on it as you approach the amber stage.
When adding the heavy cream, be cautious—this step will cause the mixture to bubble and steam dramatically. I always recommend having everything measured and ready before you begin. The result should be a silky caramel that flows beautifully into your chocolate cups. If your caramel ends up too thick, reheat gently and stir in a spoonful of water to loosen it.
Ingredients
Gather these simple ingredients to create your own chocolate caramel cups.
For the Chocolate Shell
- 1 cup dark chocolate chips
- 1 cup milk chocolate chips
For the Caramel Filling
- 1 cup granulated sugar
- 6 tablespoons unsalted butter
- 1/2 cup heavy cream
- 1 teaspoon vanilla extract
- 1/4 teaspoon sea salt
Ensure all ingredients are at room temperature for the best results.
Instructions
Follow these steps to assemble your delicious treats.
Prepare the Chocolate Shell
Melt the dark and milk chocolate chips together in a heatproof bowl over simmering water. Stir until smooth, then remove from heat. Use a spoon to evenly coat the insides of a silicone muffin tray or cupcake liners with the melted chocolate. Place in the freezer for about 10 minutes, or until set.
Make the Caramel Filling
In a medium saucepan, combine granulated sugar and 1/4 cup of water. Cook over medium heat without stirring until it turns a deep amber color. Remove from heat and carefully whisk in the butter until melted, then slowly add the heavy cream, stirring until the mixture is smooth. Stir in the vanilla extract and sea salt.
Assemble the Cups
Once the chocolate shell is set, pour the warm caramel into each chocolate cup until filled. Allow it to cool slightly, then cover with any remaining melted chocolate to seal the cups. Return to the freezer for an additional 15 minutes to set.
Serve and Enjoy
Carefully remove the chocolate cups from the mold and serve. You can sprinkle some extra sea salt on top or garnish with crushed nuts if desired. Enjoy these delightful homemade chocolate caramel cups!
Enjoy your delicious homemade treats!
Pro Tips
- For an added twist, experiment with different types of chocolate or infused caramel flavors. A hint of espresso or sea salt can also enhance the overall taste.
Serving and Storage Tips
Once assembled, your homemade chocolate caramel cups can be stored in an airtight container in the refrigerator for up to a week. If you want to make them ahead of time for a gathering, you can freeze them! Just ensure that they're wrapped well and stored in a single layer to avoid any sticking.
When serving, you can enhance the flavors by sprinkling a pinch of flaky sea salt on top. This contrast not only enhances the rich, sweet caramel but also adds a delightful crunch. If you want to elevate them even further, consider adding crushed nuts like pecans or almonds on top for added texture.
Variations to Try
Feel free to experiment with your chocolate choice! Dark chocolate lends a rich depth, while milk chocolate brings a creamier sweetness. You could even use white chocolate for a different flavor profile. If you love a hint of bitterness, try adding a few espresso beans or coffee grounds to the caramel mix for a mocha twist.
For a festive touch, consider adding flavorings like peppermint or orange zest to your chocolate or caramel. During the holiday season, these little cups can be delightful gifts. Just package them in decorative boxes, and they make perfect personalized treats your friends and family will cherish.
Questions About Recipes
→ Can I use only dark chocolate for the cups?
Yes, using all dark chocolate will give a richer flavor, just ensure it’s tempered well to maintain the shell's texture.
→ How should I store these chocolate caramel cups?
Store them in an airtight container in the refrigerator for up to a week, or freeze them for longer storage.
→ Can I substitute the heavy cream?
You can use coconut cream for a dairy-free option but the texture may slightly change.
→ What can I add to the caramel for flavor?
Besides vanilla, you can try adding bourbon, rum, or orange zest for a fun twist!
Homemade Chocolate Caramel Cups
Created by: The Savormile Team
Recipe Type: Baking & Desserts
Skill Level: Beginner
Final Quantity: 12 cups
What You'll Need
For the Chocolate Shell
- 1 cup dark chocolate chips
- 1 cup milk chocolate chips
For the Caramel Filling
- 1 cup granulated sugar
- 6 tablespoons unsalted butter
- 1/2 cup heavy cream
- 1 teaspoon vanilla extract
- 1/4 teaspoon sea salt
How-To Steps
Melt the dark and milk chocolate chips together in a heatproof bowl over simmering water. Stir until smooth, then remove from heat. Use a spoon to evenly coat the insides of a silicone muffin tray or cupcake liners with the melted chocolate. Place in the freezer for about 10 minutes, or until set.
In a medium saucepan, combine granulated sugar and 1/4 cup of water. Cook over medium heat without stirring until it turns a deep amber color. Remove from heat and carefully whisk in the butter until melted, then slowly add the heavy cream, stirring until the mixture is smooth. Stir in the vanilla extract and sea salt.
Once the chocolate shell is set, pour the warm caramel into each chocolate cup until filled. Allow it to cool slightly, then cover with any remaining melted chocolate to seal the cups. Return to the freezer for an additional 15 minutes to set.
Carefully remove the chocolate cups from the mold and serve. You can sprinkle some extra sea salt on top or garnish with crushed nuts if desired. Enjoy these delightful homemade chocolate caramel cups!
Extra Tips
- For an added twist, experiment with different types of chocolate or infused caramel flavors. A hint of espresso or sea salt can also enhance the overall taste.
Nutritional Breakdown (Per Serving)
- Calories: 380 kcal
- Total Fat: 26g
- Saturated Fat: 15g
- Cholesterol: 195mg
- Sodium: 85mg
- Total Carbohydrates: 32g
- Dietary Fiber: 3g
- Sugars: 24g
- Protein: 6g